Tuesday, March 30, 2010

Laser Pointer Shenanigans: Part 2

Since the last post about my laser pointer endeavors, I've done a few (minor) things. Well, minor in actual work involved, but major in the grand scheme of things.

Soon after I broke open the last laser pointer and played around with it, trying to get it to work again, I realized that I may have overestimated the complexity in trying to remove the unessential parts to a basic laser pointer. Apparently, the metal housing that the small piece of circuit board connects to is essential in making the laser work and preventing it from breaking into several much smaller, more useless pieces.
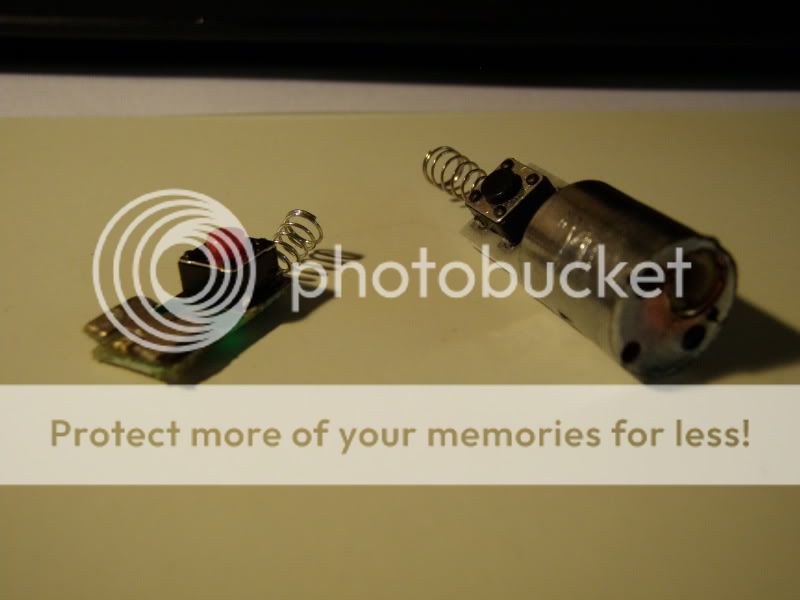


Pictured Left: DOING IT WRONG----------------------Pictured Right: Doing it right :)

About a week after the first failed attempt to isolate the usable part of the laser, I stumbled upon another crappy key chain laser pointer (~$2 including tax) while getting a few things from Micro Center. After a few careful minutes I freed the laser (intact) from its original case and to my delight, it actually still worked when hooked up to its recommended 4.5 volts.

I'm hoping to try and make some light graffiti with my digital camera at some point so my plan for the laser is to replace the current press-button with one of less physical resistance and to remount the laser in a more comfortable, easy-t0-handle casing that will allow me to use AAA batteries so it will basically last forever (at least compared to the LR44 batteries that it came with).

Busted Headphones

I was looking through my drawers a few days ago and I came across a box of miscellaneous electronic parts. I noticed a pair of old over-ear headphones that someone in the family had said only worked in the left ear, so I wanted to see if I could fix them because otherwise I would have viciously cannibalized the headphones for parts (dissect the broken ear to learn how it works and save the audio cable and working ear for future projects).

Once I had stripped the broken headphone of it's casing, I saw that the problem was in a broken plastic piece. This piece would have normally kept the supporting heavy wire (which goes over the head to transmit audio and for structural support) in place had broken off, allowing the heavy wire to move around enough to break both of the soldered joints for the headphone. After confirming that the only repair needed was some re-soldering (by testing the headphones with alligator clips), I made the repair using a small additional length of wire so the heavy wire can still jiggle around slightly but so that the wires won't break away again. Yeah, it's kind of half-assed because I didn't actually fix the plastic piece, but it's not noticeable from the outside and I'm fairly confident that the same problem won't resurface later on.

Wednesday, February 24, 2010

Laser Pointer Shenanigans

I was about to sit down and get to work on a backlog of calculus homework when I saw my old laser pointer and thought, "hmm, I should get my laser pointer working again" and in the true spirit of procrastination I immediately dropped my pencil and picked up my multi tool and key-chain laser pointer, something that I had picked up about five or six years ago at a flea market while on vacation. It's not that the laser is broken or anything, it's just that those pesky LR44 batteries aren't that common and I can't be bothered to pick them up since they barely last anyway.

The laser itself is nothing like I had expected. It's actually a very simple design: battery(+)->push button->resistor->laser->battery(-).

So far, the laser pointer is in about 8-10 pieces on my desk, but I really should get back to work so pictures and description of what I'm planning on doing later.

Friday, January 15, 2010

Programming for the Zune HD

Well I got a Zune HD, and after extensively playing with all of the fun features for a few months, I'm thinking about learning C# to program games/applications for my Zune myself. As of right now, I'm able to use XNA Game Studios 3.1 with the Zune extensions to deploy my own code to teh device, but Microsoft hasn't yet opened up the device fully to developers (so no access to WiFi or 3D features) although I can't see that as being a limiting factor since I've only just begun to learn C#. I'm hoping they do open it up at some point though, since I know there are a lot of very capable developers who would love to take advantage of Tegra and distribute their apps officially through some sort of online store.

I'll post updates on any programs I make (along with source code etc) as I chug my way through tutorials and other open source code.

Thursday, January 14, 2010

Natal Optimist - Twitter

If you've been following the gaming scene for the past year or so, you've probably heard of Microsoft's Project Natal (name may or may not be pending since it's already been named one of the best inventions of 2009 by Time along with plenty of coverage from around the net). I'm not sure if it's the gamer or geek in me that prompted the creation of NatalOptimist, but I'm looking forward to more news/tech demos within the next year regardless.

Saturday, August 29, 2009

Back to Basics


It feels like just yesterday I was programming card games in C++, but now I'm starting to learn Java so it's back to the basics -- the obligatory "Hello World" program.

NetBeans feels similar to C++ IDEs that I've used, so navigating the menus isn't hard, and once I learn to code a bit more, I'll try and make a few of my own programs and see what I can do.

Wednesday, August 26, 2009

Mmm, A Fresh Cup of Java™

I'm signed up for the AP Computer Science course at my school which focuses on Java programming, so I'm going to start learning it ahead of time. The more I can learn before the class starts, the faster I'll be able to the assignments, the more time I'll have to just chill out in class/work on my own side-projects.

I'll be following the tutorials from the Java website and using the NetBeans IDE for writing and compiling my code.

Wallpapers Part 1: Spectrum

Everyone loves to have a really great wallpaper (except you crazy terminal-based Linux users). It's the first thing you see when your computer boots up and it's the last thing you see when you shut down.

It has become a bit of a hobby of mine to collect great wallpapers from around the web. I'm currently using Photobucket as my image host so you can browse through my wallpapers and download them straight from there.

I'll update my wallpaper collection (and this blog) as I find new, cool wallpapers.

Without further ado, here are some spectrum-themed wallpapers to start things off:

Zune HD


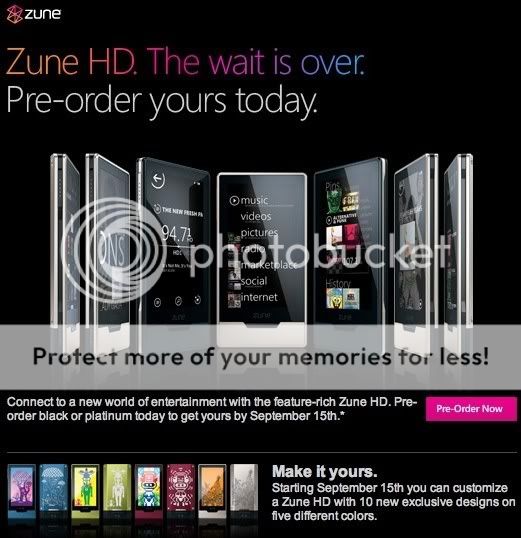
If you haven't heard, the Zune HD is Microsoft's next installment of the Zune PMP. I've been following the news of the Zune HD since the rumors began to surface back around April, and I must say this device looks like a promising contender in the PMP market.

A few of its main features are:
  • Multi-touch touchscreen
  • OLED Screen (better image, better battery life)
  • NVIDIA Tegra chipset (powerful chip with great battery life)
  • HD Radio
  • 720p output when used in conjuncture with a dock (sold separately)
  • Web browser (which might get full flash support sometime in the near future)
A list of full specs can be found here (PDF).

The Zune HD comes out September 15th and is available for pre-order from many online retailers such as Amazon and the Microsoft Store (although the pre-orders are only avaible in black for the 16gb model - $219.99 and platinum for the 32gb model - $239.99). If you order from Zune Originals after September 15th, more colors will be available.

I'm leaning towards getting one of these, although I think I'll reserve judgment until a week or two after release for some in-depth reviews. Also, I want to see what Apple has in store on September 9th at their iPod event. No doubt they'll have some announcements to try and steal some of the Zune HD's thunder. Hey, there might even be some announcements enticing enough to make me rethink the Zune, but only time will tell.

Saturday, May 16, 2009

Lab 10: Laser Tag

Well that was easy.

Lab 10 was an introduction to using structs--I had to write a program which simulates a game of laser tag between two people by using structs to store the player's names (ex: player1.name = "Tony"), their laser strength, and their shield strength. At the end the program displays the winner of that round of laser tag.

Structs are pretty simple to use and are useful (it makes organizing a lot of info much easier), and this lab only took me about 20-30 minutes.

The source code: http://www.mediafire.com/?xmzjlzjym02

Friday, May 15, 2009

Windows Live Movie Maker beta

I wanted to show my friend a video clip from a movie I have on my computer, and since I'm using Windows 7 RC1, it doesn't come with video editing software. Since I'm already trying out new things (Windows 7 being my case in point), I thought I would check to see if there were any advances in the Movie Maker department. What I found was Windows Live Movie Maker Beta, which is pretty dead simple as far as video editing goes.

You can: add text, stitch entire videos together, add music, add some simple transitions, and trim the ends of a video. That's about it, in a nutshell, although I'm hopeful that they'll be adding more features later on. For now, it's good enough for simple editing/combining videos. For saving videos, you can save your project to work on later, or you can output the video at 640x480 or 320x240 (both in .wmv format).

[Download Windows Live Movie Maker Beta] (click on the download link on the right, then you can choose to install just Movie Maker)

[Changes from previous Movie Maker versions - Windows Live Development Blog]

And now: some screen shots.


Wednesday, May 13, 2009

Windows 7: XP Mode

Grr.

I did a bit of deep digging on the matter and it turns out that my Gigabyte M61p-S3 motherboard supports AMD-V (hardware assisted virtualization), but that it's turned off by default and the only way I can turn it on again is to modify and re-flash my firmware, potentially ruining my motherboard forever. I'm gonna pass on this one.

Hopefully in a future BIOS version Gigabyte will give us the choice to turn it on or off. Until then, no XP Mode for me.

Sunday, May 10, 2009

Windows 7 RC1: Installation


I finally got around to installing Windows 7 RC1 and I gotta say: it feels good to be back.

The installation process was easy and straightforward, so much so that I'll just show a few pictures to describe (more or less) the entire process.


And after a few minutes of configuration, here's what my current desktop looks like: (click to see full-sized picture (1280x1024))


One of the biggest new features that I'm planning on trying out is the under-hyped XP Mode. In a nutshell, XP Mode is a virtual machine running a full version of Windows XP SP3, allowing users to install any applications that are outdated/don't work in Windows 7. There's also an application mode in which just the window for the program you want to run will appear (so no having to select the virtual machine, then run the program: the very annoying window-in-window effect).

I have downloaded the XP Mode software from Microsoft's site, but I need to enable AMD-V (hardware-accelerated virtualization). I haven't thoroughly checked my BIOS to turn this feature on, but as of right now I can't seem to find it. Hmm.

I'll try and find a solution and post some screen shots of XP Mode, then I'll move on to other fun stuff in Windows 7.

Thursday, May 7, 2009

Lab 9: Eight Queens

For the past few days I have been working on a C++ assignment in my "Intro to Programming II" class at school. Up until now these labs have been fairly simple to handle with a bit of logical thinking and an understanding of what needs to get done in order for the program to work correctly. Lab 9 is a bit tough and only a few people in the class have done it. Many people have just decided to skip it altogether, but I'm a stubborn programmer.

The gist of the assignment is to write a program which will place eight queens on an 8x8 chessboard. The catch is that the queens have to be placed so that none of them would be able to take some other queen in one move.

My current program is on the computer at school, so I'll update this post with my (very rough draft-esque) code.

Update:
The code as of 5/8/09
http://www.mediafire.com/file/nojt5251wlf/lab 9 eight queens.cpp
(see update 3)

It works up until the program runs into a dead end in the recursive function, where it just stops instead of returning to the previous column to try a different path. It shouldn't be too hard to fix once I find out why exactly the program stops.

Update2: So apparently the program runs fine on my computer (in Visual C++ 2008 and in Code::Blocks), but not in Xcode on my school's computers. Huh.


Update 3:
Yes! It works!
http://www.mediafire.com/download.php?nwyj3zc2cvi

It turns out that all I needed to fix the progran was "if (row>=8) return 1;"
The problem was that the function which checks up, down, left right, and the diagonals for queens makes a call to the 2d array "board[8][8]" (which represents the chessboard). On certain occasions, the program will try to check the element "board[8][x]" where x=8 which is impossible since that would mean the program is trying to check the ninth row (which doesn't exist), causing the program to end (apparently Code::Blocks isn't as picky about these sorts of things as Xcode is).

Tuesday, May 5, 2009

Windows 7 RC1

So the Windows 7 Release Candidate (build 7100) was just released for the general public to download and test run today. I'm currently running the Windows 7 Beta (build 7000) and so I just had to give the new one a try.

[Download Windows 7 RC1 straight from Microsoft]

Build 7100 comes in both 32 and 64-bit flavors and is about 2.35 gb in size (for the 32-bit version - I don't know if the 64-bit version is any bigger or smaller).

You'll need to have a Windows Live account (free to sign up) and a valid e-mail address to get to your download page (which will have the serial key to activate your version of Windows 7).

For the current Beta users out there: don't worry about having to install build 7100 immediately. Microsoft announced that "the RC will be available at least through July, and we're not limiting the number of downloads or product keys" (RC download page) and that "the Beta expires on August 1, 2009, and bi-hourly shutdowns will begin July 1, 2009. The RC will expire June 1, 2010, and the bi-hourly shutdowns will begin on March 1, 2010" (RC download page).

I just downloaded and burned the new OS to DVD this afternoon and I plan on installing it sometime this weekend (too much schoolwork to get it done during the week, but I'll be sure to include plenty of pictures/my thoughts when I get around to installing it).

Xbox Linux: Progress 2

Well I'm back with some updates on the Xbox Linux project.

Up until this point things have been going well enough. In a strange twist of fate the model of the new USB flash drive I tried using doesn't work. I then realized that I never tried the old red Club Live flash drive without having the controller plugged into the breakaway cable (not enough power in the USB port on the Xbox to support two devices at once). I backed up my data from the drive and tried formatting it again through the Xbox, and this time it worked (transferring files from Action Replay and all that jazz).


The necessary files being put on the USB drive from my computer

My original plan idea was to use the "emergency linux" file to boot a very small bit of linux code which would allow me enough access to be able to telnet into the Xbox from my computer and install a Linux distro from there. Unfortunately I realized that (after some troubleshooting) this method of installation wouldn't work on my Xbox because my dashboard version has been too recently updated (relatively speaking: it updated a few years ago).

I chose to opt for a slightly different method for getting any code to run on the Xbox: UnleashX. UnleashX is a dashboard replacement which allows for greater access and control to the Xbox. I copied the files via the USB flash drive to my Xbox and booted the new dashboard as a MechAssault game save, which I was then able to install.

UnleashX dashboard installing

The next step of the project will be finding the right Linux distro to install but for now, I think I'll take a break from Xbox Linux to focus on schoolwork (blah, tests everywhere!)

Sunday, April 19, 2009

Xbox Linux: Progress 1

MechAssault, spliced USB cable, and the USB drive

The project is going good so far compared to my previous attempts. At first I thought it failed when I plugged in my USB drive, but then I realized that I spliced the cable so that the USB drive and the controller would be sharing one USB port on the Xbox (one USB for two devices is a no-no). Here's the shot of how the USB is supposed to look (it's actually on...) and how the screen should look (USB stick recognized as Xbox memory).


After it was recognized and formatted by the Xbox, I connected it to my computer to make the USB drive work with the Action Replay software to transfer the savegame exploit.


In theory the Action Replay software should be able to transfer files to my USB drive now, but it isn't. That's going to be the next hurtle of the project (hopefully only a small one).

Xbox Linux: The Beginning

Well, not exactly the very beginning. The VERY beginning was about a year ago when I heard that I could put the old Xbox to use by installing a Linux distro on it. From there, I spliced the controller's breakaway cable to a female USB extension cord that I had. Then I realized that I didn't have any of the games required for the savegame exploit to work (I didn't want to use a modchip since I didn't have any of the right tools for opening the Xbox up to access the motherboard), so I forgot about the project for a while. A few months ago, I found someone who had the right copy of MechAsscault and he gave it to me. THEN I realized that none of the USB flash drives I owned would work to transfer the savegame for the exploit to work. Just last week, I decided to start the project back up, so I went on Amazon and got this:


for $8 (with shipping). Now that I've got all the necessary components, I'll try, once again, to get my Xbox to run Linux.

Assuming that this USB flash drive works, and that I can get xUbuntu installed properly, I might move on to making the Xbox a more readily portable computer that I can connect to TVs (modding the case to fit a small keyboard, soldering a few more USB connecters for external storage, etc).

I'll get to work on it and share my progress later tonight.

Friday, April 17, 2009

RECAP: MTmini


The finished prototype (sans trace paper)


Here's a quick little project that I threw together with the help of Seth Sandler's MTmini (multitouch mini) guide. [link]

I've always been interested in touchscreen technology and this project was a good introduction into understanding basic touch screens. The MTmini pictured above is the prototype that I made in the hopes that I would be able to just get a feel for how to put together a better version. The prototype worked well enough (as did the software), although I used an almost completely unidentifiable webcam which (as I suspected) was very unreliable. It would work for a few minutes then just shut off, and I would have to unplug/plug it into the USB port a few times before it came back on.

Here's a picture of the sketchy webcam and its homemade poster board housing (...hey, it works).


In a nutshell, the MTmini works like this:
There's a box with a webcam at the bottom which is connected to a computer running Touchlib, an open source multitouch software (read more about it on the MTmini website, or the official site). The top of the box has a hard surface with something to diffuse light (such as tracing paper). Once the user touches the surface of the box, the shadow cast by their finger is processed by the multitouch software which is then translated into different actions on the computer like mouse clicks.

Despite the shortcomings of the webcam, my MTmini worked fairly well. The software came with a few demos, but I only had a chance to try one before the webcam shut off: the picture viewer. There were a bunch of preloaded pictures which could be enlarged, moved around, etc through the use of the MTmini.

All materials used:
  • poster board
  • cardboard box from Amazon package
  • duct tape
  • no, seriously, a lot of duct tape
  • clear plastic lid
  • tracing paper
  • webcam
If I come across a better quality webcam, I'll definitely give this project another look. It might be a fun programming project to make a mouse driver to represent holding down the mouse button for games like Crayon Physics Deluxe or Falling Sand Game.

RECAP: Computer-building

Here's a little recap of my computer (parts, prices, pictures, etc):

I decided that I wanted to build a new computer about two years ago when I started getting interested in computer hardware (and when I realized that the computer I was using was built 6 years prior). I also thought that it would be good experience to get to know my computer a bit more closely (you never really know exactly what hardware quality you're getting with prebuilt systems).

I ordered all of the parts on January 5th, 2008 from Newegg (newegg for the win) and a few days later I got the parts and put it all together into a shiny new computer. Mmm, shiny.

System Specs
  • Motherboard: Gigabyte GA-M61P-S3 AM2
  • Case: CoolerMaster Centurion 5 CAC-T05-UW
  • Graphics: MSI Radeon HD 2600XT 512mb 128-bit GDDR3
  • PSU: Rosewill RD500-2SB 500W
  • CPU: AMD Athlon 64 X2 4000+ Brisbane 2.1GHz
  • Optical Drive: Samsung SH-S203B
  • HDD: Seagate Barracuda 250 gb 7200 RPM SATA
  • RAM: A-DATA 2 x 1gb DDR2 800 (5-5-5-18)
  • OS: Windows XP MCE 2005
The price came to a grand total of about $580 (including shipping and rebates). It was a pretty decent build at the time for $580, although I regret a few things such as not getting at least a 2.6GHz dual core CPU (the 2.1GHz x2 is the bottleneck of my system right now), only getting 2GB RAM (not great RAM, either), and not paying the extra $20 for a bigger hard drive.

One minor gripe about the configuration is that the graphics card uses fins on the back of the card to pull the heat away silently. As you can see in the picture (below), this blocks off access to the RAM, so adding RAM will be a bit more of a hassle than I would have hoped. On the other hand, the fins removes the need for a fan (the quieter, the better) so it was a worthwhile trade off.

Pictures
*I'm still looking for the pictures from while I was building the computer--they should hopefully still be on one of my hard drives*
In the meantime, here's a picture taken of the inside of my computer right now:

Side shot with flash


Click to enlarge (warning: 1600×1200 picture)


Future Upgrades

I probably won't do many upgrades with this computer beyond a few extra gigs of RAM and and upgrade to the processor. I'll probably build a new computer once I get a little income (job) and once I go to college. By then, I'm hoping that USB 3.0 will be out and consumer-ready (should be in 2010 according to TGdaily, assuming there are no major delays). Windows 7 should also be out (or at least close to being out, again, assuming no major delays take place) along with the usual price drops as newer technology comes out.